Todd's Guide to Creating Video Tutorials
Obviously one of the very first steps in putting together a good tutorial is making sure that you understand the topic you’re presenting about. Maybe you’re already an expert, which is great! But maybe you’re not, and that’s totally fine, too.
In fact, it’s often better to approach a topic as a beginner, because you’ll have all the same questions that your audience will also have — questions that experts might not even consider. * This is something called The Curse of Knowledge, and I'll talk about it more in a separate post And, at the end of the day, you don’t really need to be an expert — you just need to be one step ahead of your viewers.
For me, when I do research in preparation for a video, it usually involves two steps: 1) Getting a brain dump from somebody who knows the product better than me, and 2) Actually trying to use the darned thing myself. Let’s talk about those in reverse order.
Trying to use the darned thing myself
Depending on the video you’re creating, there’s a good chance you’re going to be showing some code. Maybe you’re just writing little snippets to emphasize a certain point, or you might be be creating a full “code along with me” kind of tutorial. Particularly in those latter cases, I find that it’s best if I know what my final code is going to be before I even begin writing the script.
Also, it’s really useful to struggle with building something yourself with the same documentation, samples, and resources that your customers have access to. For starters, it’ll help you find blind spots in your documentation, or bugs in your sample code. More importantly, it’ll help you come up with a good list of questions or problems that you’ll want to address in your final video, because if you’re having those questions, there’s a really good chance your customers will too.
When I wrote a tutorial for Plaid Transactions, for instance, I started off by building a mini-personal finance app. Along the way, I kept a running doc of all the questions and problems I ran into, to make sure I addressed those (or at least asked the product manager about them).
Building the sample app — the logistics
Once my project is done and I know what my final app is going to look like, I’ll go back and create a copy of this application in a completely different directory. This will eventually be my “before”, or “starter” app. I’ll strip out all the code that I’m going to want to add as part of my tutorial, and I’ll be left with a very basic functioning app.
The trick for making a good starter app is that a) It still runs, and b) You leave in any code that’s not integral to the main topic of your lessons. For instance, in most of my tutorials, I’m teaching people how to use a specific Plaid API in a client-server application. Since making and the API call is really the main point of the lesson, there’s no need to have my viewers create a server from scratch, add event handlers to buttons, or write JavaScript to render data onto the screen. So that’s all code I’ll leave in.
At this point, it’s a good idea to get your code reviewed. Usually, I’ll submit my code in three steps.
- First, I’ll check in the “Starter” version of my app in the
startdirectory, and ask my reviewer to give it a quick review. - Then, I’ll take the same starter version and copy it into a new
finisheddirectory. (Since this is the exact same code that’s in step 1, you don’t really need to get this reviewed.) - Finally, I’ll add all of my final code on top of the starter code that’s already in the
finisheddirectory.
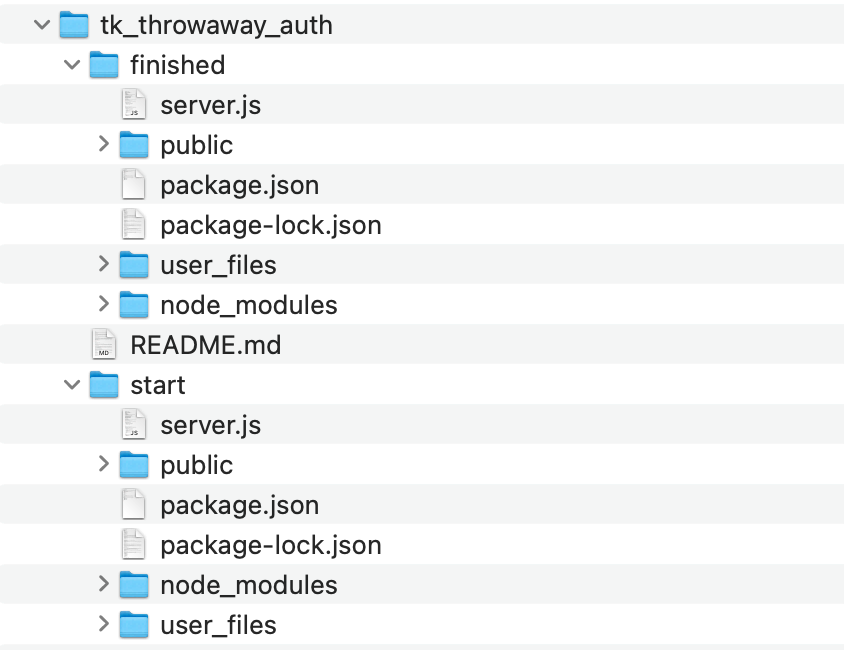
A typical sample app once I'm done populating both directories
The nice thing about submitting your code this way is that the PR(s) you submitted in step 3 include just the parts of the code that you’re going to need to cover in your video. That makes it easier for your reviewer to focus on the most important material in your tutorial, and it makes it easier for you to remember everything you’ll need to cover in your video.
Depending on the size of my code, each of these “steps” — particularly step 3 — might be broken out into several smaller PRs to make life easier for my reviewer. If you do break up step 3 into smaller steps, try to submit them chronologically, in the order you’d probably cover them in your tutorial.
I’ll often do this part of the code review in a private repository, but my long-term goal here is to have both of these directories — the “start” and “final” version — added to a github repository that I plan on making public. When I start to put together your tutorial, I’ll assume that that at least some of audience will be downloading and building this starter app alongside me.
If you want to see a finished example, here’s my
Auth sample app that’s part of a
tutorial-resources repo where I keep the majority of my tutorials.
It’ll be tempting to make your app slick and fancy, but be careful; if your code ends up so complex that it’s hard for a newbie to understand your codebase, they might miss the point of your video. Plus, every new technology you incorporate adds the risk that your viewer can’t get the same thing running on their machine. I prefer simple clunky apps to anything too fancy. For instance, in most cases, I don’t include databases in my sample apps — my “database” is usually a flat text file. I also don’t include anything that requires a module bundler like webpack.
I go back and forth between whether to use React or plain ol’ vanilla JS — it depends on whether I think React will result in less overall code to write. And if I do end up using React, I’ll try to make sure my audience spends most of their time filling out JavaScript code and nothing react-specific.
Even if you aren’t planning on doing a code-along-with-me tutorial but still plan on having code snippets in your presentation, I strongly recommend putting that code inside a somewhat functional application and running it to make sure it does what you think it does. I can’t tell you how many times I saved myself from adding incorrect code into my video because I decided to test it first.
Getting a brain dump
The other thing I like to do when I start making a video is to sit down with somebody — usually the product manager, but sometimes an engineer — who knows the product really well and ask them about it. The exact questions probably depend on the topic of the video I’m creating, but I usually try to cover the following:
- What are the most common use cases for people using the product?
- Sometimes I’ll use this information to change the window dressing of my sample application.
- When you’re trying to pitch this to somebody, how do you do it? What problem does it solve for them?
- What common misconceptions do people have about the product? Where are they most confused?
- What are the most common stumbling blocks people run into?
- What features about this product are you most excited about?
- Hey, I noticed this thing works in kind of a weird way. Why is that?
- How does (some magical part of the project) work underneath the hood?
- This sometimes is just to satisfy my own curiosity, but often times this can help me build a better mental model to understand why some things work the way they do.
- …and anything else in the list of questions that I built up while trying to build my sample app.
Take copious notes! It doesn’t have to be anything fancy — just a Google Doc (or a note taking app like Obsidian) is fine. And then you can refer to these notes later when you’re working on your script. Not everything is going to make it into your final script — nor should it — but it’s good to have this information handy.
Speaking of which, let’s talk about writing a script next!